Using the Interactive Dissector
Welcome to the University of Maryland School of Medicine Interactive Dissector. Before beginning, take a few moments to become familiar with the general layout/navigation.
The dissection pace and activities are designed to be achievable within the allotted time with one of our anatomic donors. However, at times comorbidities or past surgeries may cause a laboratory session take longer with a particular donor.
Since each laboratory session has a full schedule of material, if you fall behind and do not finish a dissection there is unlikely to be enough time to compress the missed material into the next day. A better strategy is to remain after the official lab for another half hour or as needed to complete the dissection. Several instructors often remain around after the official lab and would be happy to help out if they are available.
You are expected to complete each laboratory dissection session to the best of your capability. Failure to complete the activities assigned within a lab may impact your participation grades.
This is a 'once in a lifetime' opportunity for most physicians and an opportunity that is of diminishing availability at some medical schools.
We encourage you to make the most of your time in the lab, in a diligent and professional manner.
Navigation
In the top panel there are main navigation links:
"Home" - return to the home page
"Netter" - opens the full copy of the Netter Edition anatomic atlas, note the section at the top of the Netter page where you can switch from labeled to unlabeled images. Unlabeled images can be a great 'game' to play by printing them out and drawing in labels to structures to highlight/recall your knowledge.
"Figures" - opens an index view of all the figures used in the current and past dissector sessions.
"Photos" - opens an index view of all the photos used in the current and past dissector sessions.
"Amboss" - opens a new window to the Amboss learning content provider. the Amboss learning platform is available throughout your preclinical curriculum.
"VidaNova" - opens a new window to the front page of VidaNova.
The dissector was designed to be viewed on a 1080p resolution monitor for viewing on the large touch panel displays in the anatomy lab. On your notebook computer you may need to adjust the scaling within the browser to view all the details as intended.
Lab Sessions
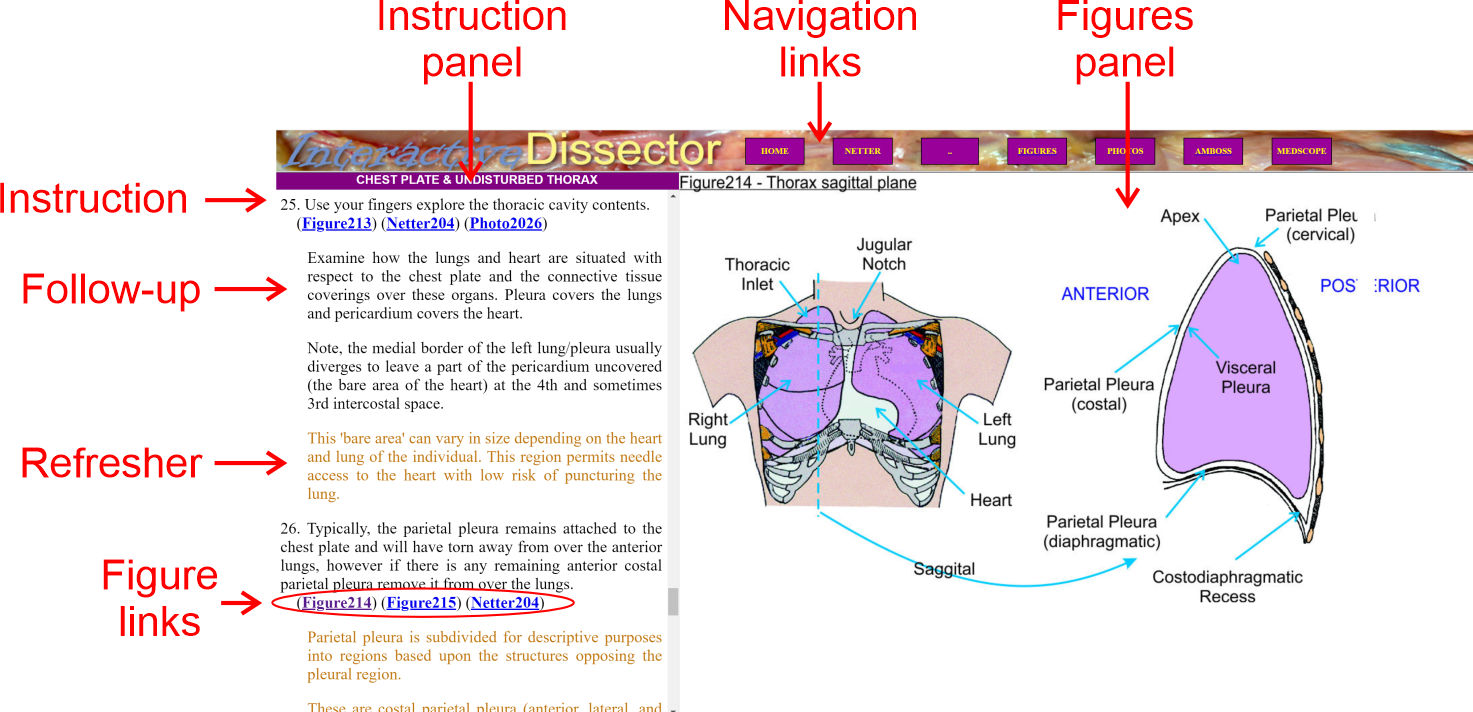
Each lab session is designed in a consistent manner with instructions and information presented in the left panel with images or additional content in the right panel.
The main numbered paragraphs describe steps to follow during the dissection. The black text indented paragraphs contain follow-up instructions or descriptions of particular structures to look for. The brown colored indented paragraphs contain background refresher and reminder information. Red text indicates safety or hazards notes for a particular step. Purple text are special notes, for example on donor care.
Associated with instructions and information are links to content:
Figures - Cartoon representations of where to cut or simplified views of the relevant structures.
Netter - Images from the Netter Atlas Edition showing the relevant structure.
Photos - Photographic images of the structure or dissection stage.
Videos - Video guide to particular steps, skills, or tool use
At the end of the procedure within each lab is a checklist of structures. This is a list of structures that we expect you to recognize and name (i.e. most structures on the wet practical will be selected from this list).
A collated PDF of the checklist items for each block can be found on the main page, it can be useful to print a copy of this for your end-of-block review session.
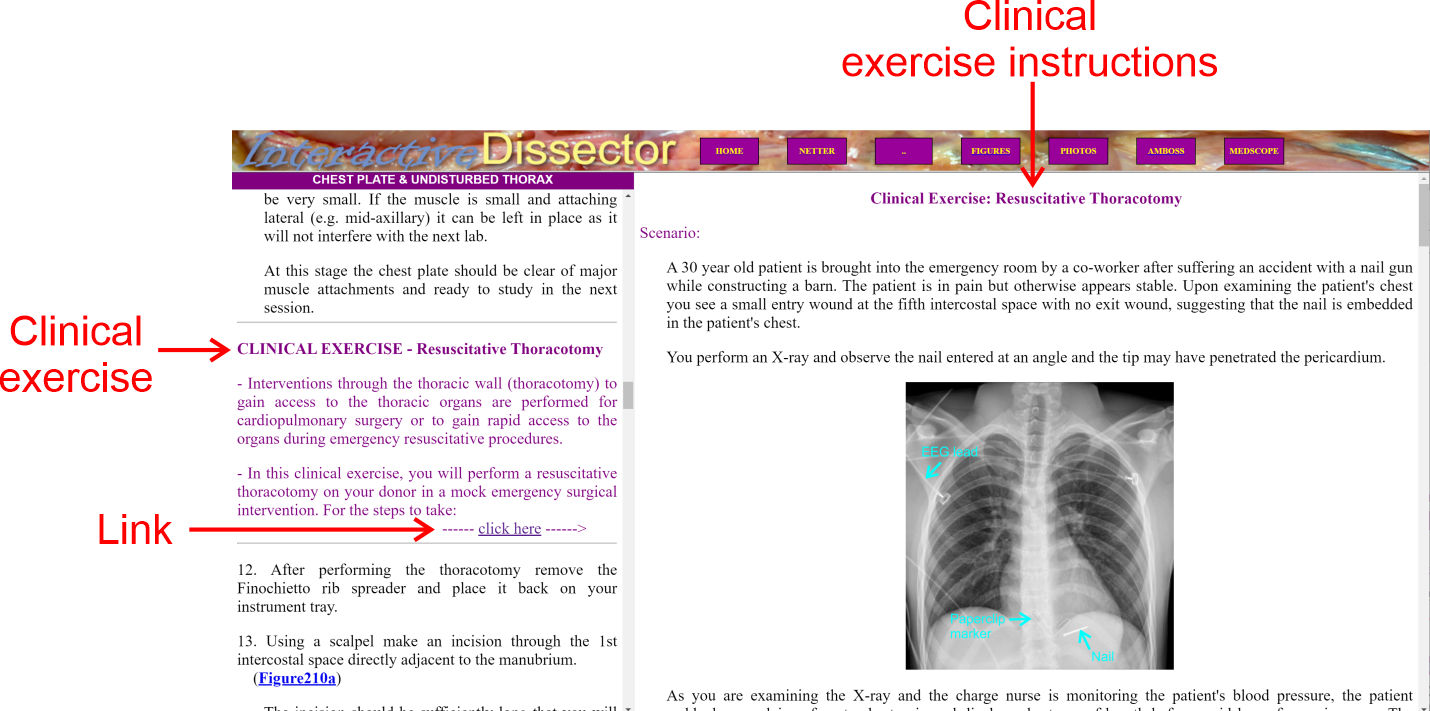
Clinical Exercises
In some lab sessions there is a clinical exercise. These consist of a scenario, diagnostics, and then a procedure. Each exercise is designed to reinforce relevant anatomy and highlight how your knowledge of anatomy is applied to correctly performing the procedure on a patient. These procedures are near identical to how they would be performed on a living patient, with only a few minor alterations to be compatible with the lab environment.
When you come to the exercise, click the yellow highlighted link and the scenario/instructions will show up in the right window. Special supplies for these activities when needed will be at the supply tables and indicated in the instructions.
You are expected to complete the clinical exercises as steps within those also form part of the necessary steps for later tasks.
Using the displays in the lab
The touch panel displays attached to a selection of dissection tables within the lab are used to access the full Interactive Dissector along with internet access to any resource of use as you dissect/study.
Login details to the computers are posted to the pillars in the laboratory should you need to log back into any of the computers in after lab review/study.
To use the laboratory touch panel displays, the full range of touch gestures are supported (touch for left mouse click, double touch to open/activate, pinch to zoom, touch-hold for right mouse click, etc.). To access a touch keyboard for typing press to the left edge in the middle and a keyboard tab will emerge, touching that tab extends the virtual keyboard to the middle of the screen.
Please try to use the stylus for most of the touch panel interactions, however we know that the touch panel screens will get dirty during use in the lab. We advise that each table wipe the screens down with the provided wet-wipes regularly to keep them as clean as possible.
Additional space is available in the front of the lab or with the prosection/models in the middle of the lab for small group or individual study.
Preparing for lab
The left panel currently shows a series of introductory pre-work steps that you should work through prior to the first dissection day in the lab.
You must review the rules governing the use of the donor lab at the University of Maryland School of Medicine, compliance with these rules is a requirement of your professional conduct. You must review any of the associated safety videos with a particular lab session (e.g. scalpel safety, safe scalpel disposal, needle handling, etc.).
Your ability to understand and work through the dissection instructions within the guide will be greatly enhanced by reading the anatomical position section, dissection terminology list, and watching the Foundation skills videos.
You will get the most from the labs by reading quickly through each lab session instructions ahead of time (prior to the lab). That will give you a good idea of what each lab hopes to achieve and hopefully minimize confusion on what to do. This also allows you to check if there are required safety videos or other pre-work that serves as a basis for the specific laboratory session.